Saturday 25 February 2012

OBIEE11G installation with Simple install

As I promised in my earlier post OBIEE installation, I will discuss how to install OBIEE to fulfil the installation scenarios provided by OBIEE documentation
 In this post I am going to cover the following installation scenario.
  1. Demonstration, Evaluation, or Proof of Concept
  2. Single-User Development
To achieve this scenario the oracle suggest go with Simple installation, so to install the OBIEE with simple install perform the following step..
1) Now first check your
     System hardwarespecification
     Metadata schema creation
Once you fulfil the specification no one can stop to you to have OBIEE environment.
2) Launch the setup from Disk1-> Setup it will pop up the following window


3) The welcome screen will appear Click Next button
4) Provide the mail id if you want to get OBIEE updates


5) Now you are no select installation window where you can select the installation type,to achieve the above scenario select the Simple install


6) The OBIEE check the prerequisites


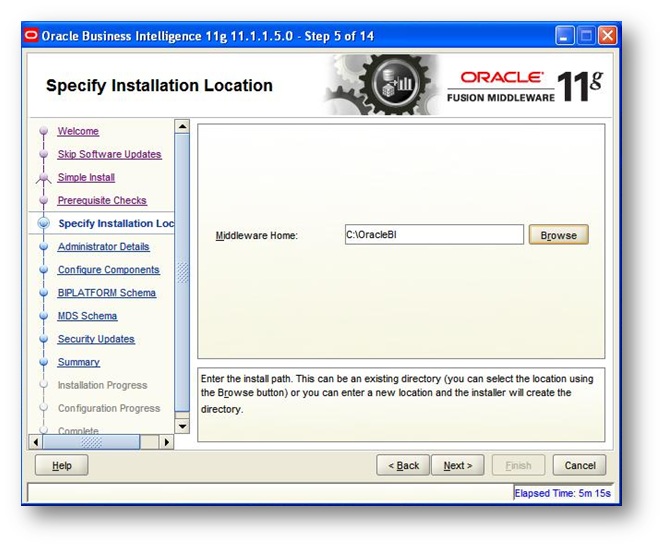
7) Select the Middleware home directory


8) Provide the administrator Detail such as User name and password


9) Select the component which you want to configure while installation


10)Provide database detail  and BIPLATFORM schema detail which were create using RCU as shown in below screen


11) Provide the MDS schema which were created in RCU


12) Provide the mail id to get the security update


13) You can check the installation summary as show below


14) Simply Click on install button the setup will start the installation to install the component on by one


15) Now just leave everything on OBIEE setup it is automatically install and configure the component you have selected.
If unfortunately the setup is get fail them check first the log file in install log file. The location of log file is available on setup screen.
Some important links of OBIEE with simple install are:
       
Component
Web link
Presentation
http://machine_name:7001/analytics
Enterprise Manger
http://Machine_name:7001/em
Weblogic(Console)
http://Machine_Name:7001/console


Saturday 18 February 2012

Installation of OBIEE11g

When I started my carrier as BI developer, I got good opportunities to work on different area of OBIEE such as
  1. Report development
  2. RPD development
  3. OBIEE Administration…. Etc.  
But to explore this knowledge or to study in detail related to these area, I feel I need one OBIEE environment and then I started to collect the information how to install the obiee11g and configure it on the system and I feel it is very much importance to have OBIEE environment to try and error or to understand better about OBIEE
In this post I am presenting the overview of what to test before start the installation. I will discuss the all highlight topics one by one so feel free to share your views.

To install the OBIEE11g follow the following steps

Pre-requisites

1) System Requirements and Specifications 
2) Metadata schema creation 

If you fulfil the pre-requisite the move forward and lunch the setup file

There are three types of installation are available

  1. Simple Install
  2. Enterprise Install
  3. Software install
Now it’s totally depending upon the requirement, for which installation to go. The oracle documentation provided following scenario 

1) Demonstration, Evaluation, or Proof of Concept
2) Single-User Develop
3) Enterprise Deployment for Hosted Development and Production
      Installing a Single, Scaled-out Oracle Business Intelligence Instance on Multiple Computers
      Installing Multiple, Standalone Oracle Business Intelligence Instances on a Single Computers
4) Enterprise Deployment for Highest Levels of Availability and Security

I will discuss in some of my upcoming post regarding the different installation procedure to achieve the above mention scenarios.
Please feel free to share the view or suggest any suggestion related to installation of OBIEE11G.

Repository Creation Utility(RCU)

Two metadata repositories are required:
  •    the Metadata Services (MDS)
  •     And Business Intelligence Platform (BIPLATFORM)
To create the Oracle Business Intelligence schemas using RCU:

1) Extract the RCU .zip file; access the bin directory in the RCU_HOME. Run the rcu.bat for windows  environment or run the. /rcu for UNIX environment.
2) The Welcome screen opens. Click Next 
3) In the next screen you can see the two options
  • Create: Create and load component schemas in to database
  • Drop: Remove the component schemas from database 
    Select Create Radio button and click on next
4)  Provide the database detail where do you want to create the schemas
   Host Name: Name or ip of database server
   Port: it is by default 1521 provided by oracle for oracle database
   Services Name: Check the service name of your database in tnsname file and give it to service name field.
   User name & Password: provide the User name & Password which has dba privileges.
   Role: select Role depends upon the user you have given.
Click Next. The Checking Prerequisites screen opens. After the checking is complete with no errors, click OK to dismiss the screen and proceed to the Select Components screen.
5) Component Detail ->Select the Oracle Business Intelligence Component. This action automatically selects the Metadata Services (MDS) schema (under the AS Common Schemas group), which is also required by Oracle Business Intelligence. 


6) Schema Passwords -> Use Same Password for all schemas


7) Map Table space


8) After the schemas are created with no errors, the Completion Summary screen opens.
9) In the Completion Summary screen, click Close.
Congratulation!!! Now you have metadata schema required fro OBIEE installation. Click here to check how to install OBIEE11g.

Reference:
http://docs.oracle.com/cd/E21764_01/bi.1111/e10539/c3_requrmnts.htm

System Requirements and Specifications to install OBIEE11g

Do you have plane to install obiee11g? Then check first whether you system hardware and operating system fulfils the “System Requirements and Specifications” provided by oracle. You can view the System Requirements and Specifications on link


If your system fulfils the Requirements and Specifications provided by Oracle then check further detail OBIEE11G Installation.

Saturday 11 February 2012

How to migrate the single Dashboard or folder from one system to another

Most of the OBIEE related people know how to deploy the new catalog from one system to another or we can called from development to test environment
After migration of catalog from development to test, the issue will arises we can call these issue as formatting or quality and then the issue will get resolve in development environment.
If the issue are only related to the particular Dashboard or folder then after issue gets resolved. The administrator needs to migrate the changes from development to test environment to get sign off on the issue. In such situation no need to migrate the entire catalog to test system, just migrate the particular Folder or Dashboard to test environment

To migrate the particular Folder or dashboard perform the following steps

1) Log in to the catalog manager
     Start-> All Programs-> oracle Business Intelligence -> catalog manager
2) Open the catalog from which the folder is migrating( development catalog)
3) Select the folder want to migrate
4) Click on File->Archive
5) The new window will pop up: Select the Path to save the folder or Dashboard. The file save with .RTF


6) Copy the .RTF file to test server
7) Log in to the Test  catalog in online or offline mode
8) Select folder under which does you want to migrate the folder, for example if you want to migrate folder at share location then select share location folder.
9) Delete the folder if it is already present or you can overwrite it with new one.
10) Click on File-> Unarchive.
11) The new window will pop up, select the archive file location and click OK.
12) Now you can view the folder or Dashboard with expected changes are now in test environment for further quality assurance.

Wednesday 1 February 2012

Assertion failure: isXsiTypeSqlExpression(rExpr) at line 67 of /net/stasunnas09/export/ifarm_test/solaris64/views/ aime_bifndn_936652/bifndn/analytics_web/main/proje ct/webreport/exprformulautils.cpp Error Details Error Codes: ACIOA5LN


If you have OBIEE10g and have plan to upgrade to OBIEE11g, then you come across the following message

Assertion failure: isXsiTypeSqlExpression(rExpr) at line 67 of /net/stasunnas09/export/ifarm_test/solaris64/views/ aime_bifndn_936652/bifndn/analytics_web/main/proje ct/webreport/exprformulautils.cpp
Error Details
Error Codes: ACIOA5LN

This is actually the OBIEE upgradation bug, to resolve this bug the oracle provided the” 12561330 - DRILL DOWN REPORTS WITH SQL FILTER ARE ERRORING OUT  IN SYSTEM TEST ENV” patch

But this patch is only available for WINDOW (32 bit & 64 bit) and LINUX(x86 & x64).

To overcome this bug without patch: as we do not have any patch available for Solaris. Need to remove the save filter from the report and reapply it but not from previous location as we had in OBIEE10g

NOT:  DO NOT CHANGE THE SAVE FILTER AS Apply contents of filter instead of a reference to the filter. IT WILL RESOLVE THE PARENT REPORT ISSUE BUT STILL THE REMAIN WITH DRILL DOWN REPORT.